5 Organization within a Document
Document headers provide many benefits, including:
- idea organization,
- document navigation by clicking on the relevant section in the side panel,
- interactive tables of contents,
- document accessibility.
You can apply these skills with a few keystrokes within Google Docs or Microsoft word. All you need to do is press Ctrl+Atl+(number) on a PC or Cmd+Alt+(number) on a Mac.
Examples
These are some examples of how headers can help.
- Use headers to organize notes on a (hypothetical) American Wars course by date. At a glance, you can jump from your class on October 6th on the WWI to your class on November 3rd on the Vietnam War.
- When writing a research paper, you can jump from your introduction to your conclusion with a click. This can help you ensure that your introduction and conclusion make a similar argument.
- In Microsoft Word, you can collapse all sections of your document other than the one or two that you are currently working on.
Most other advanced text editors have their own methods of creating document headers for navigation. This document will focus on two basic word processors: Microsoft Word and Google Docs. Note that Microsoft Word is still the industry standard as a word processor. Google Docs makes sharing easier but is not as fully featured as Microsoft Word.
5.1 Theory
Environment setup: navigation pane
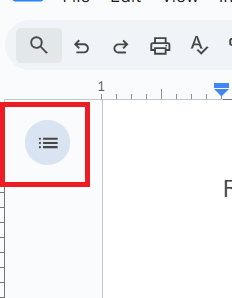
To see the navigation pane in Microsoft Word, go to the View ribbon. In the “Show” section, click “navigation pane.” Google Docs opens the navigation pane by default. You may need to click the list icon at the top right of your screen.

Mouse/trackpad headings
You can select a heading from the “style” section of the “home” ribbon. This is easy but takes time.
Keyboard headings
Headings are especially useful if you memorize the keystrokes to generate the headings.
| Type | Microsoft Word (PC) |
Google Docs (PC) |
Microsoft Word (Mac) |
Google Docs (Mac) |
| Heading level 1 | Ctrl+alt+1 | Ctrl+alt+1 | Cmd+alt+1 | Cmd+alt+1 |
| Heading level 2 | Ctrl+alt+2 | Ctrl+alt+2 | Cmd+alt+2 | Cmd+alt+2 |
| Heading level 3 | Ctrl+alt+3 | Ctrl+alt+3 | Cmd+alt+3 | Cmd+alt+3 |
| Normal | Ctrl+shift+n | Ctrl+alt+0 | Cmd+shift+n | Cmd+alt+0 |
| Heading dialogue box | Ctrl+shift+s |
Note that Google Docs lets you create additional heading levels using the same pattern. Microsoft Word stops keyboard shortcuts after heading level 3, although Ctrl+shift+s provides a handy alternative for lower level headings.
A handy trick in Microsoft Word is to change the case pattern of selected text using shift+f3. You can cycle between UPPER CASE, Camel Case, and lower case.
Change format of all headers
On either platform, you can adjust heading formats easily with the following steps:
- Move to one of the existing headers in this document, such as “Theory”. Change the format; you can bold it, for example. Keep your cursor blinking on that header.
- To make all headers with that level match your new format
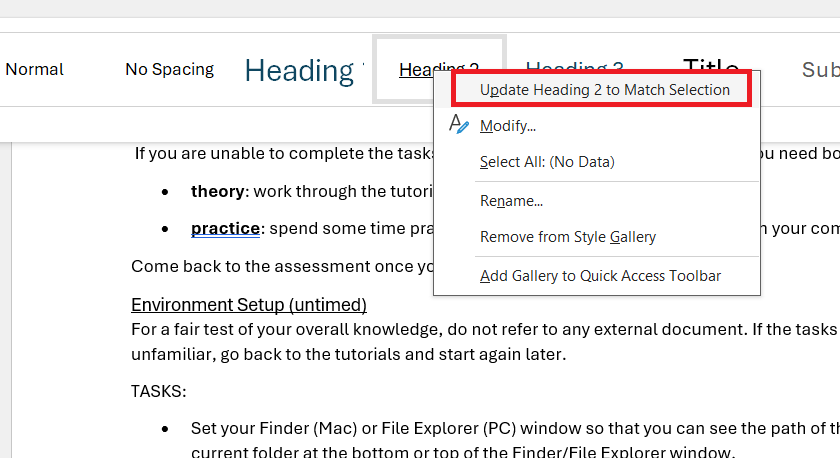
- Microsoft Word: Select the “Home” ribbon. In the “style” section, right click on the appropriate header. Click “update to match selection.”
- Google Docs: Click into the heading section of the ribbon. Move your cursor to the appropriate heading. Click “Update heading __ to match.”
- All headings of that level will now match the format of the heading your cursor started on.

5.2 Practice
Copy and paste tasks 1-4 into Google Docs or Microsoft Word. Note that if you have already completed “Environment Setup,” you will have the entire tutorial downloaded to your computer. Instead of copy-pasting the text in this section to a word processor, you can work within that downloaded document.
Tasks:
- Make the “Tasks” line above into heading level 3 with just your keyboard.
- Change the format of the “Tasks” line.
- Apply that format to all level 3 headings in the document.
- Undo your changes with just your keyboard.